One of the benefits of an EV campervan is a built-in HVAC (heating ventilation and cooling) system. This system runs directly from the HV (high voltage) traction battery and can be used when parked up and sleeping overnight in the van to provide heating, ventilation, dehumidification and even cooling.
Many conventional campervans have diesel or propane heaters, besides being smelly and a source of carbon emissions these heaters usually heat the air inside the van rather than provided heated fresh air from the outside which results in poor air quality and lots of condensation.
In an electric van, the HVAC system works just the same as when the van is being driven, providing warm fresh air with no condensation. If there is a lot of humidity in the van e.g. when cooking or drying wet clothes the A/C can be used in conjunction with heat to provide dehumidification.
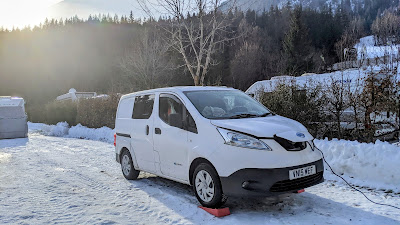 |
| Cosy winter camping in -4 degC in Austria |

Induction hob cooked pancakes for breakfast before a day skiing :-)
Nissan e-NV200 Campervan HVAC operation
The e-NV200 has a PTC (positive temperature coefficient) resistive heater and an A/C compressor with cabin heat exchanger. Other vehicles may have a different heating system, e.g. the Nissan Leaf had a PTC + heat pump heating system which is a bit more efficient at heating in a mild climate. As far as I'm aware I don't know of any EV vans which have a heat pump.
For the rest of this post I'll focus on heating in the e-NV200, but the same procedures also apply to cooling:
a.) When charging:
E.g. Charging from 7kW wall-box, domestic socket granny cable, campsite hookup or Rapid Charging.
Being able to run the heater while charging is a very useful feature of the e-NV200. Unbelievably some vans, like the Peugeot Partner Electric (2013-2019), don't allow the heater to run while charging, this makes the Peugeot Partner Electric very unsuitable for use as a campervan.
To turn on the heater while charging:
1. Ensure a charging session is active (flashing blue lights on the dashboard), if the vehicle has stopped charging due to the battery being full, disconnect then reconnect the charging connector to restart a charging session.
2. Press the orange power button twice (or put foot on the brake and press once).
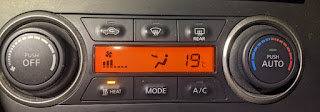
3. Switch on and adjust the HVAC to the required settings. For overnight use I prefer manual heating 16 degC, fan speed 2 and air directed forward.
4. The energy drawn by the heater will cause a normal AC (e.g 7kW wallbox / granny cable) charging session to be prolonged indefinitely, with the energy used by the heater being provided by the charging point. A Rapid Charge will stop when the vehicle's HV traction battery is fully charged.
5. The van can be locked using the door lock button next the gear selector on the centre console.
Important Note #1: using the heater or air conditioning (A/C) when Rapid Charging will disable the HV battery cooling system, therefore unless essential I would avoid using the heater or A/C when rapid charging if you plan to do multiple rapid chargers in a single day or when the ambient temperature is hot.
Important Note #2: If the charging session stops (e.g hookup trips, granny cable is unplugged, wallbox switches off) when the van is switched on, the van will enter 'accessory mode' which will result in the 12V battery rapidly draining. While quite rare, this can be disastrous since the van can only last for about 3-4 hours in accessory mode before fully draining the 12V flat. If the 12V battery is flat, you won't be able to switch the van on, irrespective of the state of charge of the HV traction battery. A flat 12V will require a jump start using jump leads to another vehicle or the use of a jumper pack. To mitigate this issue, I would recommend fitting an audible low 12V battery alarm and an easily visible readout of the 12V battery voltage. A healthy voltage is above 12V, anything less than 12V is a cause for concern, less than 11V may not be able to start the van.
b.) When off-grid (not charging):
For the heater to run when the van is not charging, the van needs to be switched on in 'Ready' mode, i.e ready to drive:
1. Depress the foot brake and press the orange power button once.
2. Switch on and adjust the HVAC to the required settings. For overnight use I prefer manual heating 16 degC, fan speed 2 and air directed forward.
3. The DRLs (daylight running lights) will be lit. To switch these off, you will need to remove the relay or fuse for the DRLs from the fuse box under the bonnet. I've installed a remote control 12V latching relay, so I can remotley switch off/on the DRLs from inside the cabin.
4. The energy to run the heater will be provided by the HV traction battery:
In my experience when running the heater with a 14 degree temperature difference between inside and outside, e.g 2 degC outside and 16 degC inside, the heater will draw an average of 617W. Therefore, 10 hours of use would use 6kWh ≈ 15% SoC reduction in our 40kWh van = approximately 18 miles of range loss, or 1.8 miles of range loss per hour.
c.) Remote Climate (pre-heat or cool)
The remote climate can be activated remotely and will pre-heat or cool the van to 21 deg C. The remote climate will recirculate the air and operate with a high fan speed. Since the air is recirculated, remote climate is not suitable for use when you're inside the van, however it's very useful to defrost the van on winter mornings. Remote climate can be activated in a number of ways:
1. Using the button on the key fob, assuming it's within range.
2. Using the Nissan Connect mobile app, unreliable in my experience.
3. Using OVMS (Open Vehicle Monitoring System), very reliable and responsive but requires extra hardware.
Video of OVMS android app enabling remote climate: