Since I'm interested in
electronics/electrics and I like my electronic gadgets when I
converted my Citroen Dispatch van into a camper a couple of years ago
I made sure I put in a large 12V auxiliary/leisure battery. The
actual battery I used was not a normal leisure battery, it was
actually borrowed from a friend left over from a wind turbine
project, I think it's originally from a UPS system. With 110Ahr
capacity it's big enough to power my four
large LED light units (Four units of 8 x 3mm LED's in series) for one
months continuously, change a phone for 8 days continuously or power
a laptop for 36 hrs continuously (assuming a 50% discharge of the leisure battery). A leisure battery is different from
a normal car battery in that it can handle 'deep-cycling', while lead
acid car batteries should always be topped-up and never let to run
down on a regular basis.
I added a split-charge
relay and ran a wire from the engine bay to charge the leisure
battery when the vans engine in running, when the engine is stopped
the relay breaks the parallel connection between the main van battery
and the leisure battery. The means the leisure battery drained
without danger of not being able to start the van's engine.
 |
| Fig1. Split-charge system block diagram |
Caution: The
information in this post is just an account of what I did, I take no
responsibility for your van, nor do a guarantee that the information
is correct. However the system
as been working reliably in my van for over two years and almost 22K
miles.
I used a 12V 100A
relay.
The main steps to
setting up the system are:
- Finding the correct wire from the alternator to provide a signal to the relay to indicate when the van's engine is running (Fig 4). The relay is an electromagnetically operated switch, the charge control signal from the alternator activates the electromagnet in the relay which pull together contacts which create a parallel link between the two batteries. This connection is broken when the electromagnet in the relay is switched off when the van's engine is stopped. You can use a multimeter to check you have the correct wire from the alternator, it should read 12-14V when the engine is on and 0V when the engine is off. This cable must be tapped into carefully without breaking the link and soldered and heat shrinked to avoid any shorting. The the photo below for location of this charge control signal wire, it's the thin brown wire coming out of the alternator.
- Running a wire (I used lighting flex with both live and neutral connected together to increase capacity) from the engine bay to the back of the van. This is actually harder than I though it would be. On my Citroen Dispatch the engine bay is practically sealed off from the rest of the van. I found (by laying on my back in the drivers foot-well) I could remove a plastic slug from a rubber grommet which created a hole large enough to poke a piece of stiff fencing wire though when then could be used to pull the flex through. In the end, this worked out to be a very tidy and waterproof job. I removed the plastic trim and rubber floor under the drivers seat the route the flex tidily into the rear of the van. I located my leisure battery behind the bench passenger seat.
- Find a good earth in the rear of the van. The van chassis, as with all vehicles is the earth/GND/Negative. This reduces the amount of wiring needed by half; this meant I only needed the run one wire (the positive) from the engine bay the charge the leisure battery. To complete the circuit the negative (-) of the leisure battery needs to be connected to the chassis. It needs to be connected well to have a 'good earth'. When I fist connected up the set-up I was confused why the leisure battery was charging at a slower rate than it should have been (measuring the current with a multi-meter in series). After much fiddling it turned out that the leisure battery had not been connected the the van chassis with a good enough earth connection. A good earth connection can be found by making sure the contact is clean of paint, dirt and oil and part of the main van chassis.
 |
| Fig 2. Under the hood |
 |
| Fig 3. Split-charge relay |
 |
| Fig 4. Identification of alternator charge control indicator wire |
The state of charge of the battery can be estimated from it's open-circuit voltage (voltage across the terminals when nothing is connected), here's a graph taken from Wikipedia for estimating charge % based on voltage:
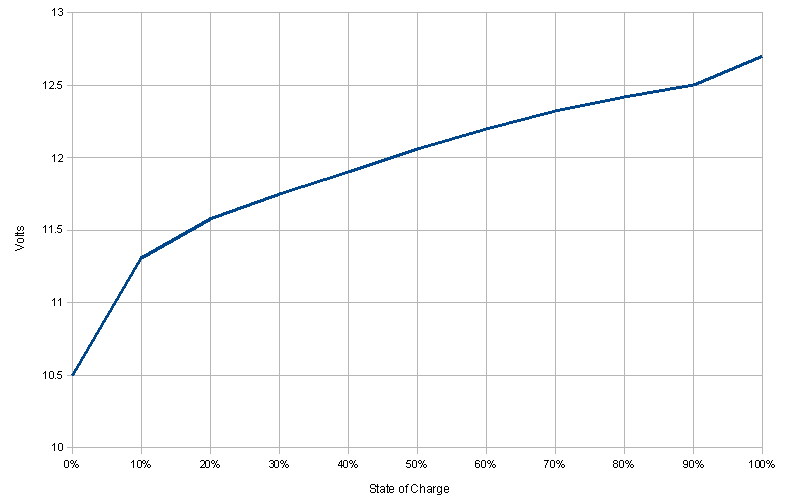 |
| http://en.wikipedia.org/wiki/Lead%E2%80%93acid_battery |
Given the time I would love to tidy up the wiring in my van and add a little built in LCD display to show how much charge is left in the battery.
Good luck with your van conversion projects, it's a lot of work but very satisfying!